Think of the Glow Plug driver as if it was just another servo. The difference being that instead of a motor moving the control arm it controls an electronic Power supply that turns your glow plug on and off.
The glow plug is turned on and off simply by setting your throttle stick to the position where you want the glow plug to be engaged and then pressing a “set” button on the Glow Driver. At high throttle settings you don’t need the glow plug so it will be off when the throttle is above the set point. The Glow driver will remember this setting even after power is removed so you’ll never have to set it again. The Glow Driver also has a “reverse” switch in the event that your throttle servo is operating in the reverse mode. The reverse setting is also saved in non-volatile memory just like the “set” switch.
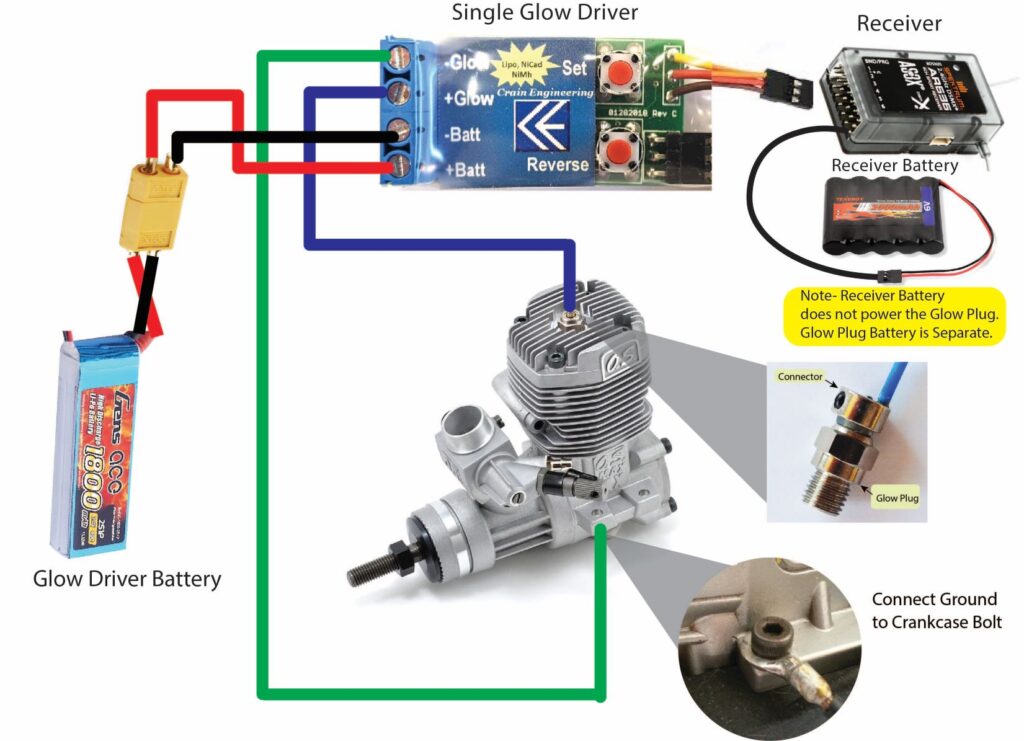
The Picture below shows the connections to your engine and receiver radio.
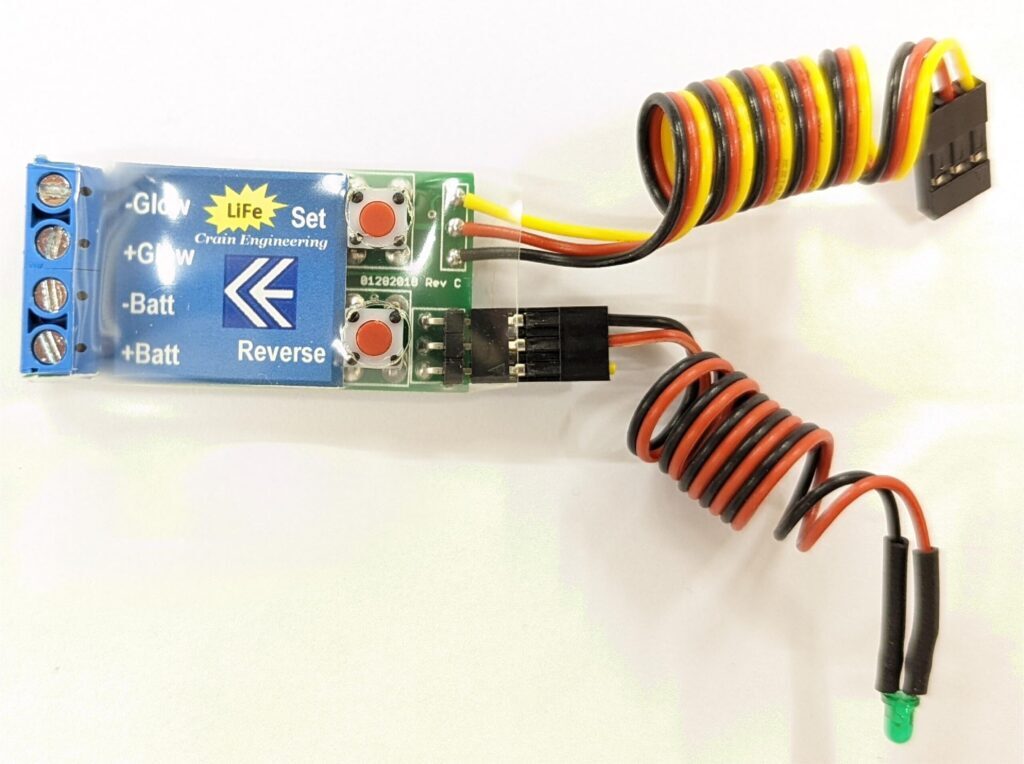
The Glow plug driver is so small and lightweight we didn’t put mounting holes on it. Just stick a piece of Velcro on the back side and mount it anywhere inside the receiver/Servo compartment. Then connect the wiring to your glow plug and battery to the screw type terminal block, plug in the servo connector to your receiver. Finally, mount the LED indicator light in a location you find most convenient. (I drill a small 1/8″ hole in the fuselage and CA the Led in place)
![]() We have two models of Glow Driver. One for LiPo batteries, the other is for LiFe batteries. The choice of LiPo or LiFe is up to you, both types work equally well. However, you must match the Glow Driver type to the battery type in order to get an accurate shutoff voltage setting. It won’t damage anything if you use the wrong type but you won’t get the proper shutoff voltage setting. You can use one, two or three cell batteries.
We have two models of Glow Driver. One for LiPo batteries, the other is for LiFe batteries. The choice of LiPo or LiFe is up to you, both types work equally well. However, you must match the Glow Driver type to the battery type in order to get an accurate shutoff voltage setting. It won’t damage anything if you use the wrong type but you won’t get the proper shutoff voltage setting. You can use one, two or three cell batteries.
The Glow driver electronics are powered from the receiver battery, just like the other servos in your system. Only the glow plug is driven from the Glow driver battery.
We recommend:
- 350mah 2 cell battery for the Single Glow Plug Driver
- 800mah 2 cell battery for the Multi Cylinder Glow Plugs Driver
Our recommendation is based on the objective of minimizing size and weight while still giving you a full day of flying on a single charge.
Our course you can go even larger or smaller but our recommendation is based on actual experience.
#16 or #18 gauge stranded hookup wire for both the glow plugs and the battery connection. Automotive hookup wire is the easiest to work with and also easy to find at just about any automotive part store or hardware store. Solid wire works too but stranded wire is more flexible than solid and also less likely to break due to the vibrations from the engine.
My favorite wire is silicone insulation wire. It’s very flexible and won’t melt when you solder it. You can find it on Amazon.
Physically, the two versions are the same. The only difference is the voltage setting used to determine when the battery is drained to the point where the Glow Plug should be turned off.
As you know, Lipo’s and LiFe batteries can be damaged if they are drained too much. So the Glow Plug Driver will automatically shutoff the supply to the glow plug if the Glow Battery is drained beyond it’s limit. If that happens, the Glow Driver will flash the LED slowly so you’ll know that it’s no longer supplying power to the Glow Plug.
Using a LiPo battery with a LiFe Glow Driver or a LiFe battery with a Lipo Glow driver will not damage anything but it will indicate low voltage and do an automatic shutoff at incorrect voltage levels. So it’s important to match the correct battery to the driver.
![]()
Glow Plugs use considerable power so we designed the glow driver to supply the glow plug with a separate and dedicated battery. This avoids the problem of draining your receiver battery. Even if the Glow Battery gets drained your plane will still fly because the Glow Plug is powered by a totally separate “Glow battery”.
The Glow driver electronics are powered from the receiver battery, just like all the other servos in your system. Only the glow plug is driven from the Glow driver battery.
The Receiver Battery. The driver looks like a servo to your receiver and gets the small amount of power to operate from the receiver battery pack. The Glow Plug Battery provides the power to drive the Glow Plug. The Glow Plug Battery is used exclusively to power the glow plug.
Yes, whenever you turn off power to the receiver it will also turn off the Glow Plug Driver and the Glow Plug.
The Glow Plug Driver essentially is an ‘electronic switch’. So it’s not necessary to add a switch to turn off the Glow Battery.
Yes, you can drive two glow plugs with the single Glow Plug Driver but not more than two.
The figure below shows how to make a parallel connection to two Glow Plugs.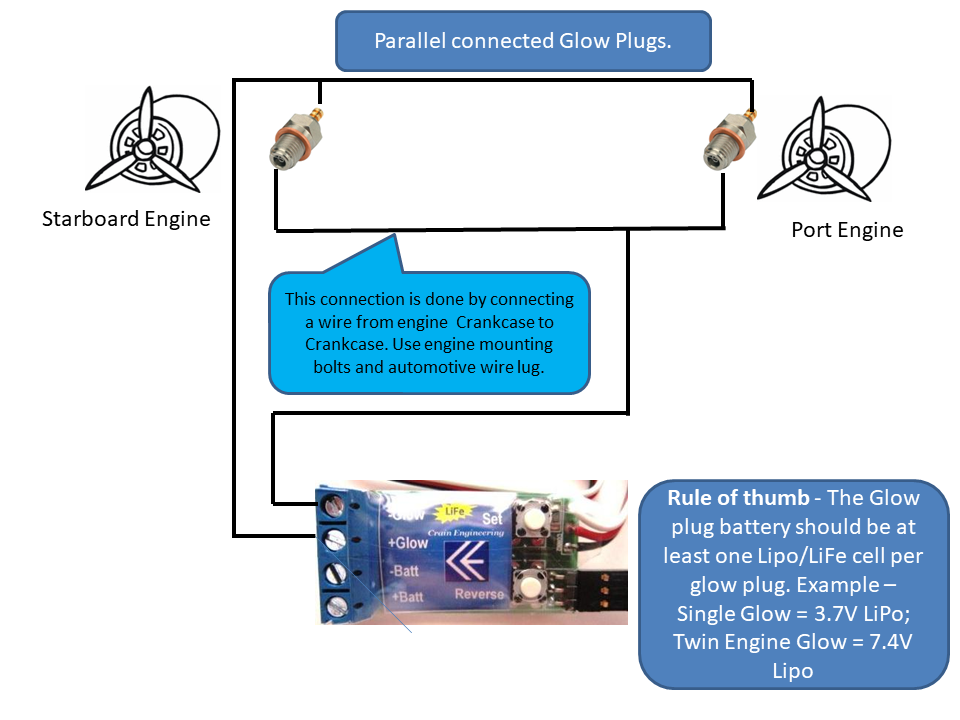
Note – In 2018 The Single Glow Plug Driver design was changed. If you purchased your Single Glow Driver in 2019 or later then just connect the two Glow Plugs in parallel. Prior to 2018 the plugs are connected in Series.
If you’re not sure which version you have just look at the Glow Plug Driver Circuit board. If you see text on the circuit board between the ‘Set’ and ‘Reverse’ switches that have a number ending in 2018 followed by ‘Rev. B’ then you have the latest version. That version uses the parallel connection. If there is no text then you have the older version which would use the series connection.
To get the best energy effeciency, and thus the most drive time of your Glow Battery, the Glow Driver is a PWM (Pulse Width Modulated) type power source. Calculating the battery run time based on the pulse widths and voltages can be confusing. So the best way to calculate the total time your battery will supply the glow plug is to use a straightforward energy equation.
The equation is: Energy = Power * Time …or in other words… Watt Seconds = Watts * Seconds
I’ll use a three cell 11.1 Volt 1600 maH LiPo as an example. Then I’ll explain that this size battery is probably much more than you will need.
First, lets look at the voltage and current if a pure DC battery was used to drive your Glow Plug. For the Glow plug used in my Saito 125, a 1.2V NiCad battery will drive a DC current of 3 amps in the glow plug. So the power is 1.2 Volts x 3 Amps = 3.6 Watts.
Next, calculate the total energy available in the LiPo. A Lipo is considered discharged when the cell voltage drops to 3 Volts. Our Glow plug driver will automatically shutoff when an 11.1 Volt three cell Lipo drops to 9.0 Volts. This protects the battery from damage. Let’s assume that the voltage drops linearly as it discharges. (Not technically correct but it’s a reasonable approximation) That means the average voltage over the life of the charge will be 10.05 Volts. Let’s make it simple and just say 10 Volts. So for our 1600 mah 3 cell LiPo the total energy available for a charge is 10 Volts x 1.6 Amp hour = 16 Watt hours. (1000 milliamps = 1 Amp) Now convert Watt hours to Watt seconds.
So 16 Watt hours * 3600 Seconds/Hour = 57600 Watt seconds.
To determine the time our battery will drive the glow plug you now take the total energy available in the battery by the wattage drawn by the glow plug.
So time = (57600 Watt seconds) / (3.6 Watts) = 16000 seconds.
Converting to minutes we get 16000 seconds / (60 seconds/minute) = 266.67 minutes.
Or converting to hours we get 266.67 minutes / (60 minutes/Hour) = 4.44 Hours.
Considering the glow plug will only be on for a few minutes of each flight the 4.44 hours of power in your battery will last a very long time and for many flights. For comparison purposes, I use a very small single cell 500 maH Lipo as the Glow plug battery in my plane. It’s very small and lightweight. It lasts me for a full day of flying. Of course the length of your flights, the throttle set point, and the amount of time spent running at slow speed will effect your time.
Finally, the ‘C’ rating of the battery should be at least 20. The higher the better. Especially for the ‘Multi’. If the ‘C’ rating is too low then the voltage will drop too much when the Glow Plug is on. This will result in a premature ‘Low battery Voltage’ shutoff.
Use the example above and plug in your battery characteristics into the equations to determine your run time.
Use the ‘Multi’ Glow plug driver. The Multi can drive up to four glow plugs.
The negative lead connects to the Engine block. See the pictures below.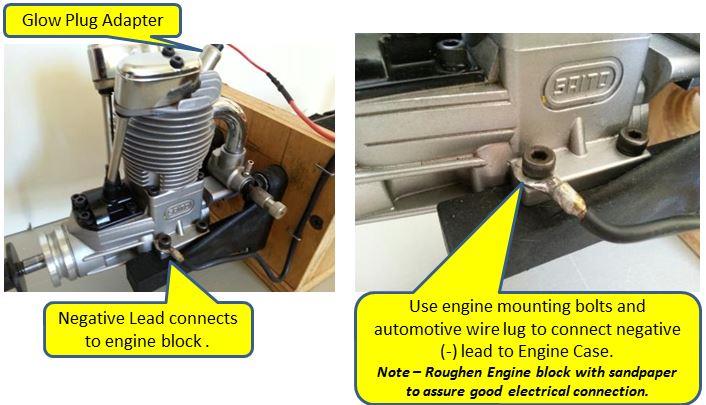
If you are using a dedicated channel to control the Glow driver rather than a Y-connector on your throttle channel and you have an unused switch on your transmitter, then you can set up this channel so the switch can act as an enable/disable switch. Mix a switch with the throttle so you can completely turn off the glow driver no matter where the throttle is positioned. Just program the channel so the throttle is mixed 100% and then add an additional mix with the switch.
Make sure you put the throttle stick at the desired threshold position before you press the ‘Set’ button. Also, you may have to reverse the direction with the ‘Reverse’ button. Also, remember the transmitter and receiver need to be on and the Glow Driver needs to be plugged into the desired channel during the setup process.
A couple of things to check:
- First, is the Glow Plug Driver connected to the throttle channel through a Y-harness or is it connected to an alternate channel where the Throttle is mixed into that channel? If it is connected via a Y-harness, then set the throttle stick on the transmitter at mid throttle and then press the ‘Set’ button on the Glow Plug Driver. Then move the throttle stick up and down to verify the Glow Driver goes on/off. You may have to press the ‘Reverse’ button if the glow plug goes on/off opposite the desired direction of throttle throw.
- If the Glow driver is driven off a spare channel where the channel is mixed with throttle channel, then most likely the mix is not setup correctly on the transmitter. The best way to verify the mix is correct is to plug in a spare servo instead of the glow plug driver temporarily. Use this spare servo to make sure it tracks with the throttle servo. Once verified, then plug the Glow Plug Driver back into the channel and go through the ‘Set’ procedure again.
In either case, Y-Harness or alternate channel with throttle mix, setup the Glow driver with throttle at midpoint first to verify proper Glow on/off and direction (reverse switch) operation. Once verified, then set the throttle at the desired on/off threshold and press ‘Set’ again.